I have decided to take the plunge and install FreeBSD as a desktop operating system. The machine is a 2012 HP Compaq with an i7 and an ATi FirePro 3900 (Turks) graphics card. The details don’t matter too much beyond what’s detailed in the title. If you have an old PC with an ATi/AMD graphics card, this guide should work for you. Check this matrix to see if your card falls into this category (radeon) or the newer amdgpu category. In the future, I’ll make separate articles for Nvidia and integrated Intel graphics. If you have an amdgpu, everything in this guide should work except you should replace radeonkms with amdgpu.
First, I should note that it took several attempts before I succeeded. Should you install desktop FreeBSD? Not unless you are prepared to tinker. I initially tried GhostBSD because it touts itself as a ready to go FreeBSD desktop with a graphical installer. Unfortunately, the graphical installer didn’t seem to like my hardware and I couldn’t figure out a way to hack my way around it with the console it dumped me into. I’m genuinely curious to try out MidnightBSD and helloSystem, but the former was forked from FreeBSD a long time ago and I wanted my system to actually be FreeBSD. The latter is still in development and may not be ready for prime time. In a future article I’ll try both out in a VM.
Systems
Success
Going with the plain-jane OS from freebsd.org and then setting up a desktop environment worked, albeit it required a bit of tweaking.
Failure
Comes with a graphical installer, which would be cool if it worked with my hardware. Documentation was no help. There were some weird things I encountered by attempting to install it. The installer loads itself into RAM before running (why?), it uses a shell called fish, and it uses OpenRC instead of rc.d. It was based on TrueOS before that project was discontinued and at least the latter two appear to be legacies of this. I like the idea of providing an image of FreeBSD ready to go for the desktop with a graphical installer, but I think this would work better if they embraced being a convenient way to run desktop BSD rather than changing the fundamentals.
Haven’t Tried
This desktop-oriented BSD was forked from FreeBSD 6.1. It looks like it is persistently maintained and remains compatible with FreeBSD software, but honestly I was afraid to commit to it since it was forked so long ago. It looks like since it was forked it has brought in code from all the other BSDs, which might result in an interesting feature set. When I get bhyve up and running I’ll test it out in a VM and write up a post about it.
This is still in beta and looks like it has a long way to go. Despite the FreeBSD core, it has a lot of experimental features, making it a bad choice for a daily driver right now. I’ll test it out in the future and write about it.
Desktop Environments
Success
A fully featured desktop environment with lots of bells and whistles. Designed for customization. Default look mimics windows but the customization options and plugins let you do pretty much anything. I like to make it look like macOS, but it takes some work. Uses the QT framework. KDE, as an organization, makes a ton of other software, too.
A lightweight desktop that uses a dock. Default configuration very ugly. Can be extensively customized, but not to the extent of KDE. Won’t have all the animation effects and dazzle of KDE even if you spend a lot of time customizing. Takes longer to customize than KDE. Uses GTK framework.
Failure
Despite the fact that many in the community vocally dislike the design decisions of Gnome since version 3 came out, it’s still the default desktop environment on the biggest Linux distros (Red Hat and Ubuntu). Honestly, I think Gnome is the best Linux DE because all I have to do is add the dash-to-dock extension and it’s perfectly usable for me. KDE & XFCE take me at least an hour of customization and configuration once I install them. Gnome also just looks the best without applying any sort of theme. Unfortunately, I can’t use Gnome on my laptops because it will only use libinput for trackpads, and trying to calibrate this for a MacBook seems to be all but impossible. Apparently, I can’t use Gnome for FreeBSD on my tower because, well, I never figured that out. It looks like some issue with the graphics card. My understanding is that Gnome has many “Linuxisms” built in so it can be difficult on FreeBSD. I gave up. GTK framework. [NOTE: I’ve learned a lot figuring out KDE and XFCE, so I have some ideas that might make Gnome work. I’ll give it another shot in the future.]
Haven’t Tried
Lightweight distro. I haven’t used it in many years (back then it was LXDE). If you have a resource-strapped system or laptop, this is a good option because it’s efficient. Since KDE worked for me I imagine this shouldn’t be a problem. I might test this out one day and provide an update. QT framework.
Forked version of Gnome2. You can customize it. Looks and functions okay but if you scratch beneath the surface everything feels extremely dated. Does everything okay but doesn’t excel at anything. GTK framework.
Window Managers
These are kind of like desktop environments but you have to put all the pieces together yourself. I view them as artifacts of the past, and considering I barely have the patience to make KDE/XFCE customized the way I want, I have never bothered with these. If you want to go crazy with customization, this is the way to go.
Winning Combination
I ended up going with FreeBSD + KDE. While you can install multiple DEs concurrently, I don’t like doing this. They all install a bunch of default software and you end up with a bunch of redundancies by installing more than one. I guess you could install your DEs in jails, but I don’t really see the utility in that. I also prefer to try to go mostly with Qt or GTK software, depending on which DE I have installed. It’s impossible to avoid crossing the two frameworks without really limiting your software choices, but I show preference for software designed for one or the other based on DE because software often looks better on a GUI it it was designed for and you’ll find yourself installing less extra dependencies.
Time needed: 20 minutes
Install Desktop FreeBSD
- Download FreeBSD ISO and Copy to Drive
Get FreeBSD installer, insert USB drive, and copy installer.
- Boot Installation Device on Desktop
Insert USB drive into desktop and boot machine.
- Run FreeBSD Installer on Desktop
Run FreeBSD installer and choose appropriate configuration options.
- Post-Installation Setup
Enter your networking, localization, service, and security settings.
- Boot FreeBSD and Install Desktop Software
Install your graphics card driver, xorg, kde5, and sddm.
- Configure Software
Configure your graphics driver, dbus, and sddm in rc.conf
- Reboot and Enjoy Desktop FreeBSD
You should now have a working system. Enjoy!
1. Download FreeBSD ISO and Copy to Drive
Head over to the FreeBSD downloads and select “FreeBSD-13.1-RELEASE-amd64-memstick.img.”
Once you have opened this, type the following in your favorite command-line utility:
sharp@macbook:~ # dd if=FreeBSD-13.1-RELEASE-amd64-memstick.img of=/dev/da0 bs=1M conv=sync show=progressIf you use Windows or do not feel comfortable using a command line, you can use the Raspberry Pi Imager (or pretty much any similar utility). Follow the same steps I took to install FreeBSD to Raspberry Pi in this article.
2. Boot Installation Device on Desktop
If you are installing on a PC, you can usually escape the bootloader that initially launches by hitting esc. Navigate to select boot disk (or some variant thereof) and find your FreeBSD installation media.
On a Mac, hold the option key down at boot. This should bring up the installation media as an icon. If you cannot boot the media, try installing rEFInd.
3. Run FreeBSD Installer on Desktop
Once the flash drive boots up, you will usually be prompted to install FreeBSD. If you don’t get this or if you decide to login and try things out first, you can type bsdinstall to launch the installer. After selecting your keyboard and a name for your computer, you will see the following prompt (note, the images further down look slightly different because I repurposed those from my Raspberry Pi install and they were captured from a terminal running SSH):
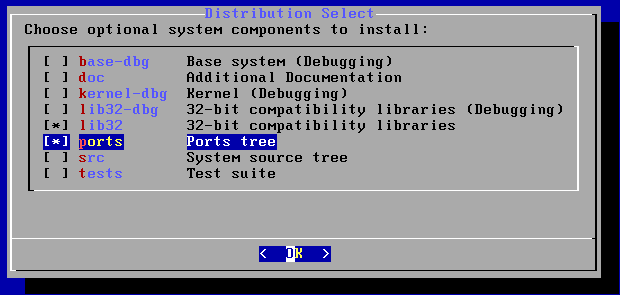
Select ports and lib32. I also to src and doc, but they are not crucial for anything we’re doing.
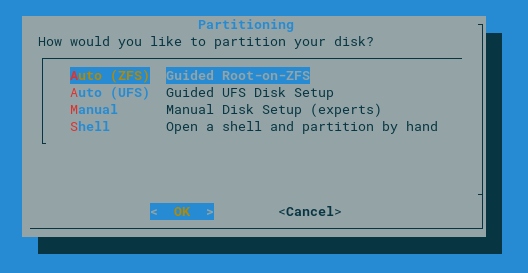
Unless you don’t actually need this guide, use “Auto.” If you have plenty of RAM and you might have crucial data on the system, use ZFS. If you have limited resources or storage isn’t a primary concern, use UFS.
The next couple of steps just advance through using the defaults.

Now we’re installing FreeBSD.
4. Post-Installation Setup
Next, you will be asked to create a root password and a new user. Create at least one new user. You can use all the default options except when prompted to add the user to a group, enter wheel and then when prompted to add to additional groups, add video.
After you have done this, we just have a few more configuration options. The first couple you can just use the defaults. For networking, select DHCP. The rest is self explanatory until this step:
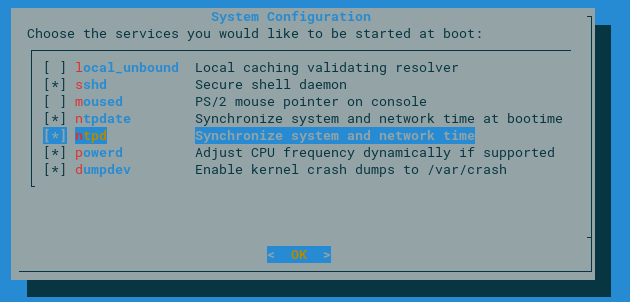
Here you select what service daemons you want to enable. You will need moused for your mouse. Everything else is optional. For a desktop system you probably don’t need local_unbound or sshd. Either ntpdate or ntpd are fine, but using the former can slow down the boot time a bit because it needs to establish a network connection first. I recommend powerd, especially for laptops, because it will save power.
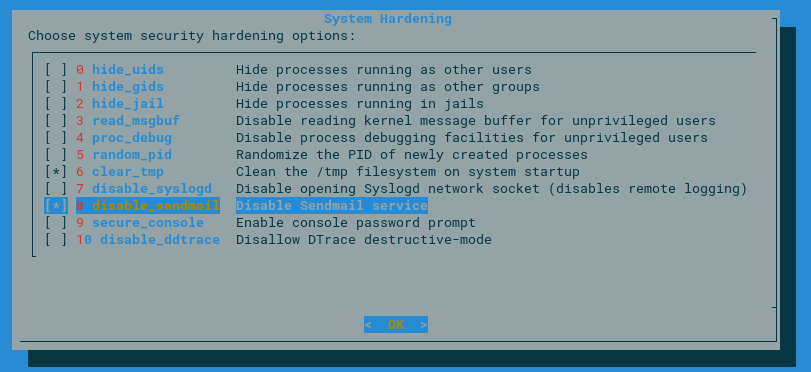
I should learn more about these options. Somewhere I read a good balance between security/usability is to check the last six. Honestly, unless you’re running a server or you have sensitive stuff on your computer (which, would require more security hardening than is presented here), then I’m not sure how much of a difference these will make. If I’m wrong, please let me know. There are two that I definitely recommend: 1) clean the /tmp filesystem on startup and 2) disable sendmail. The former because you want to do that even for non-security reasons (it could get filled up with error log files or other crap and waste space) and the latter because you probably won’t use sendmail for desktop FreeBSD.
5. Boot FreeBSD and Install Desktop Software
Once installation is complete your system will reboot and we can use FreeBSD. However, all we have is the command line at this point. Log in as root.
First, we need to install the graphics driver. Usually I use pkg to install software but I could only get the driver to work when installed from source.
First, navigate to /usr/ports/graphics/drm-fbsd13-kmod/ and type the following:
sharp@sharp-tower:/usr/ports/graphics/drm-fbsd13-kmod # Make install cleanUse the default options.
Now we need to install everything necessary for KDE:
sharp@sharp-tower:~/ # pkg install --yes kde5 xorg sddm consolekit2This will take a while. There are more minimal installs I would have preferred, but honestly every time I tried this I seemed to be missing some necessary package and KDE wouldn’t run. On the plus side, it will give you everything you need. However, you may not want to use their default stuff (such as e-mail client) and a bunch of it you won’t need. Personally, I hate clutter so I deleted a bunch of it after the fact.
6. Configure Software
To make everything work we need to edit /etc/rc.conf. The first line is optional (but recommended), the last three are necessary:
linux_enable="YES"
kld_list="radeonkms"
dbus_enable="YES"
sddm_enable="YES"
7. Reboot and Enjoy Desktop FreeBSD
Assuming everything has gone well, upon reboot you should be taken to the KDE login screen. Note that you can only log in with the user(s) you created in step 4, not root. You’re now ready to explore KDE and use FreeBSD as a desktop.
Troubleshooting
If your resolution is all screwy or if you log into KDE and you get a black screen and a cursor, it’s probably because the graphics driver isn’t loading correctly. Make sure you have no typos in /etc/rc.conf.
- You can check to see if the radeon kernel module is loaded by typing kldstat. You should see multiple kernel modules with radeon in the name. If it’s not, double check that you don’t need the amdgpu driver. You can also try reinstalling the driver. Remember, you must install the driver from the ports collection, not pkg.
- Add the following line to /etc/fstab:
proc /proc procfs rw 0 0- Add the following line to /boot/loader/conf:
kern.vty=vt- Install the xorg driver:
sharp@sharp-tower:~ # pkg install xf86-video-ati- Start KDE through .xinitrc instead of sddm. First, delete the line about sddm in rc.conf. Then create a file in your home directory (non-root user) called .xinitrc with the following content:
exec ck-launch-session startplasma-x11Conclusion
With everything in this guide, you should be able to install desktop FreeBSD. If you have any suggestions/tips to improve this guide or if you were unable to install FreeBSD as desktop, please shoot me an e-mail.