NextCloud is a software suite designed to run on a server as a competitor to Office 365 and Google Workspace. Unlike those services, NextCloud is open source and can be run for free by anyone with an interest in maintaining their own server. You can also pay NextCloud or a third-party provider to handle the software for you. By itself, NextCloud doesn’t do a whole lot. It functions to run dozens of “apps” that do all sorts of things like messaging, video chat, kanban, and document creation. For an individual most of these apps won’t be particularly useful, but for an organization, NextCloud provides an appealing alternative to Microsoft and Google.
Time needed: 1 hour
Install NextCloud on FreeBSD
- Install PHP and required modules
# pkg install php82 php82-pdo_mysql php82-ctype php82-curl php82-dom php82-filter php82-gd php82-mbstring php82-posix php82-session php82-simplexml php82-xmlreader php82-xmlwriter php82-zip php82-zlib php82-bz2 php82-intl php82-imap php82-bcmath php82-gmp php82-exif php82-pecl-apcu php82-pecl-imagick php82-pcntl php82-phar
- Install Apache
# pkg install apache24
- Configure PHP on Apache
Add necessary lines to httpd.conf.
- Configure php.ini
Some adjustments need to be made to /usr/local/etc/php.ini
- Enable and Start Apache
# sysrc apache24_enable=yes && apachectl start
- Test PHP
Create a info.php file and test php.
- Install MariaDB
# pkg install maria106-server maria106-client
See below for configuration. - Additional Apache Configuration
Configure Apache to server your content.
- Install NextCloud
Fetch NextCloud installer, unzip, and set permission ownership to ‘www’.
NextCloud is easy to install on FreeBSD. For my purposes, I’m running NextCloud in a jail on a remote server with a public IP address. I’m not going to cover the jail setup and basic networking, but I’m using iocage to manage the jails. You can also use Bastille, and I do have an article I wrote about setting up Bastille jails. If you intend to just run NextCloud on your local network, you can follow the instructions in that article to setup a jail. If you plan to install this on a remote server like I am, I recommend you check out the FreeBSD Handbook section on Networking.
1. Install PHP
NextCloud uses PHP, so we need to install it with the many required php modules. Some of these are optional. Check out the official documentation if you want to change this up.
# pkg install php82 php82-pdo_pgsql php82-ctype php82-curl php82-dom php82-filter php82-gd php82-mbstring php82-posix php82-session php82-simplexml php82-xmlreader php82-xmlwriter php82-zip php82-zlib php82-bz2 php82-intl php82-imap php82-bcmath php82-gmp php82-exif php82-pecl-apcu php82-pecl-imagick php82-pcntl php82-phar php82-opcache php82-xml2. Install Apache
Apache is the websever that runs NextCloud. Install it with the php module.
# pkg install apache243. Configure PHP on Apache
The Apache configuration files are located in /usr/local/etc/apache24. The primary configuration file is called httpd.conf. Technically, all configurations could be put in this file, but for the sake of organization this gets split up into multiple files. FreeBSD doesn’t split it up too much, so we’ll put most of our stuff directly in httpd.conf. If you come from a Red Hat-based system this will feel familiar. Debian-based systems, like Ubuntu, break up the httpd.conf file into many more pieces and rely on a command-line tool to enable and disable modules (which I find annoying).
First, we need to tell Apache to load “index.php” by default if a file isn’t specified. Find the following lines in httpd.conf and add “index.php” as seen below in red. If you want, you can delete “index.html.”
<IfModule dir_module>
    DirectoryIndex index.php index.html
</IfModule>
Next, we need to enable some Apache modules. You do this by uncommenting the following lines (remove the # at the beginning of the lines). If these lines aren’t in your httpd.conf file then add them where you see a list of stuff all starting with “LoadModule.”
LoadModule proxy_module libexec/apache24/mod_proxy.so
LoadModule proxy_fcgi_module libexec/apache24/mod_proxy_fcgi.so
LoadModule mpm_event_module libexec/apache24/mod_mpm_event.so
Enabling mod_mpm_event.so means we have to disable the default php handler, prefork. Here we do the opposite, add the # before the line.
# LoadModule mpm_prefork_module libexec/apache24/mod_mpm_prefork.soNext, we need to configure Apache to handle php files. Go to /usr/local/etc/apache24/Includes and create a new file. I called mine php-fpm.conf but you call it whatever you like as long as it ends in .conf.
<FilesMatch \.php$>
    SetHandler proxy:unix:/tmp/php-fpm.sock|fcgi://localhost/
</FilesMatch>
Now we need to edit /usr/local/etc/php-fpm.d/www.conf. Find the following lines. You’ll need to edit the first line, the second two you will probably just have to uncomment (remove the ;).
listen = /tmp/php-fpm.sock
listen.owner = www
listen.group = www
4. Configure php.ini
Next we need to make some tweaks to /usr/local/etc/php.ini. If this file doesn’t exist, you should see php.ini-production. Take this file and save it as php.ini. Find the following lines and change the values accordingly. If the line is commented out (#), delete the #. Keep in mind that you may need to increase this higher at a later time if you need to upload large files.
post_max_size = 513M
upload_max_filesize = 513M
Next, find the following lines and uncomment them and set the according values:
[opcache]
zend_extension=opcache
opcache.enable=1
opcache.enable_cli=1
opcache.memory_consumption=512
opcache.interned_strings_buffer=8
opcache.max_accelerated_files=10000
opcache.revalidate_freq=1
opcache.save_comments=1
5. Enable and Start Apache
# sysrc apache24_enable=yes && apachectl startNote, if there are any configuration errors, Apache will fail to start and explain where the error occurs. You might get a warning telling you that the ServerName is not set or is set to localhost (e.g. 127.0.0.1). You can either set the name in httpd.conf or /etc/hosts. If you set it in httpd.conf, just search for ServerName. Uncomment the line (remove the #) and add your domain name or IP address, whichever you plan on using.
Now let’s enable and start php-fpm. Likewise, pay attention to any error messages that might pop up.
# sysrc php_fpm_enable=yes
# service php-fpm start
# apachectl restart
6.Test PHP
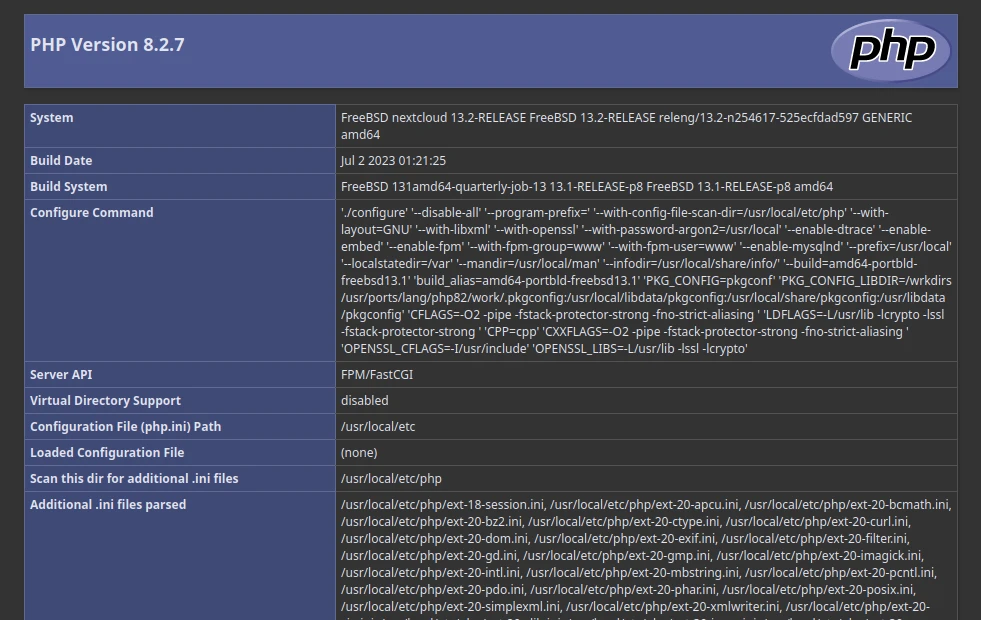
Before we go further, we should probably make sure everything is working accordingly. Navigate to /usr/local/www/apache24/data and create a file called info.php. Paste the following content into the file:
<?php phpinfo(); ?>In a web browser, navigate to http://[address]/info.php, replacing [address] with your URL or IP address. You should see the php.info page if things worked correctly you will see that under “Server API” the value will be “FPM/FastCGI.”
7. Install & Configure MariaDB
We need a database for NextCloud so let’s install that now that we have our web server up and running.
# pkg install mariadb106-server mariadb106-clientNow enable the database.
# sysrc mysql_enable=yes
# service mysql-server start
Secure database. Run the following command and follow the prompt.
# mysql_secure_installationOpen up MariaDB.
# mariadbNow add a user/password for NextCloud. Remember (write down) the password!
> CREATE DATABASE nextcloud;
> CREATE USER 'nexcloud'@'localhost'
> GRANT ALL PRIVILEGES ON nextcloud.* TO 'press'@'localhost' IDENTIFIED BY 'testpasswordfortrialpurposes000';
> FLUSH PRIVILEGES;
> exit
8. Additional Apache Configurations
Note: I’m using vhosts because I find it’s a convenient way to add SSL support after things are up and running. This isn’t the only way to configure things, but it works.
Uncomment the following lines in httpd.conf. This will allow Apache to configure virtual hosts (first line) and then point to the file httpd-vhosts.conf to add the virtual host configurations.
LoadModule vhost_alias_module libexec/apache24/mod_vhost_alias.so

Include etc/apache24/extra/httpd-vhosts.conf
Now we need to edit /usr/local/etc/apache24/extra/httpd-vhosts.conf to point to NextCloud. The file will be filled with an example configuration that won’t work. We need to replace it, replacing 1.1.1.1 with your IP address and the ServerName with your domain. You can call the error/access logs whatever you want and change the ServerAdmin email (or omit it).
<VirtualHost 1.1.1.1:80>
    ServerAdmin [email protected]
    DocumentRoot "/usr/local/www/nextcloud"
    ServerName nextcloud.sharpwriting.net
    ErrorLog "/var/log/nextcloud-error_log"
    CustomLog "/var/log/nextcloud-access_log" common
<FilesMatch \.php$>
    SetHandler proxy:unix:/tmp/php-fpm.sock|fcgi://localhost/
</FilesMatch>
  <Directory /usr/local/www/html/nextcloud/>
    Require all granted
    AllowOverride All
    Options FollowSymLinks MultiViews
    <IfModule mod_dav.c>
      Dav off
    </IfModule>
  </Directory>
</VirtualHost>
9. Install NextCloud
Now everything should be prepared for NextCloud. The following commands 1) move to the appropriate directory, 2) download the latest NextCloud version 3) extract the file 4) set permissions so Apache can read the folder, and 5) restart Apache, 6) restart php-fpm.
# cd /usr/local/www/
# fetch https://download.nextcloud.com/server/releases/latest.zip
# unzip latest.zip
# chown -R www:www nextcloud
# apachectl restart
# service php-fpm restart
Now we need to open a web browser and go to our site. If everything worked well, we should see the NextCloud installation wizard.
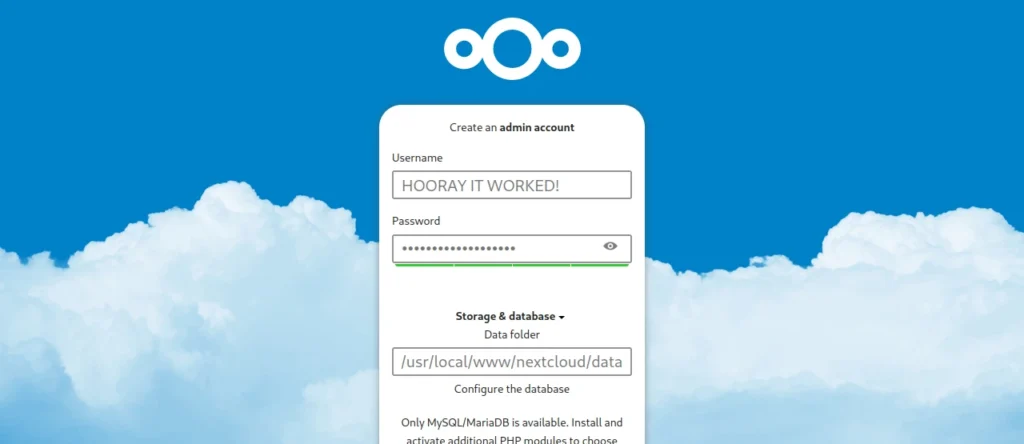
You’ll need to punch in your desired user name and password, then scroll down and enter the MariaDB information we created in step 10.
note: If you installed this in a jail, like I did, you’ll have to edit /usr/local/etc/mysql/conf.d/server.cnf and change the bind-address. Using iocage, I set a localhost IP address for my jail (which, honestly, I don’t really understand because elsewhere I have read this can only be done using vnet, which I don’t use—but it works). This step can be tricky depending on where you set up your SQL server and how you set up your system. If you didn’t use a jail, then “localhost:3306” or “127.0.0.1:3306” should work fine. Jails are great but they do complicate networking a bit. Another fun challenge would be to jail the database separately from the web server.
You have now installed NextCloud on FreeBSD
Now it’s time to have some fun playing around with NextCloud. There are tons of apps to check out. My first order of business will be to add SSL. I’m not sure whether I’ll keep it installed or not. The major thing that seems to hold NextCloud back from being a Google/Microsoft replacement is the lack of email. It has sever webmail options, but these need to connect to a separate email server. Gmail and Outlook are the foundational elements of the competitor services and NextCloud would do well to prioritize the importance of email. Plus, running an email server would open the doors to all sorts of automation and CRM plugins that would allow it to compete with things like Constant Contact.
NextCloud seems like it’s extremely close to achieving its goals, but it’s just not quite there yet. I’m going to at least keep the jail around, if not active, and perhaps I’ll come back to it.