If you’re like me (or followed my guide), you still run PHP on Apache using the old mod_php module. It’s easy, it works, and used to be the preferred way to run PHP and Apache. But times have changed and Apache now recommends using FastCGI (php-fpm). They claim it will significantly decrease the memory footprint, speed things up, and make issues easier to diagnose (I can attest to the last of these because our server at work uses FastCGI). One of the reasons for the performance increase is that mod_php activates anytime a person interacts with your website, even if they’re just touching static content like images or css. This doesn’t happen with php-fpm, which only activates when PHP needs to be parsed.
FastCGI has been around for a long time so this isn’t exactly new stuff. However, most WordPress (and other PHP-based CMS) install tutorials just instruct you to install mod_php. Why? It’s easy and if you’re reading the install tutorial, the performance benefits probably won’t affect you. But suppose your site starts to get some traffic or you’re strapped for resources. Or maybe you just don’t want to depend on an Apache module that the Apache Foundation itself has moved on from. Time to upgrade.
Fortunately, although implementing FastCGI involves a few more steps than mod_php, it’s really not that complicated. Once you’ve made the change, there’s only one big difference that may affect you as an admin. With mod_php, Apache is running php. A separate service runs php-fpm. So oftentimes when you make changes (such as to php.ini) you have to usually restart Apache for the changes to take effect. With php-fpm, you have to restart the php-fpm service.
Let’s transition this site away from mod_php!
note: This setup involves a WordPress site configured as an Apache Virtual Host. Here’s how I set it up. If you don’t use a Virtual Host configuration, you should be able to put the relevant configurations either in the httpd.conf file or in a file ending with .conf in the Includes folder. If you go this route, you might want to read the official httpd wiki or the official documentation. Remember, it’s always good practice to copy any important files before you modify them so you can easily revert your changes should you really screw things up.
Time needed: 30 minutes
Transition from mod_php to php-fpm.
- Activate fcgi module (and a few others)
Uncomment lines for mod_proxy_fcgi.so, mod_proxy.so, mod_mpm_event.so in httpd.conf
- Deactivate mod_php
Comment out the mod_php line in httpd.conf
- Create PHP Config File for Apache
This tells Apache how to deal with .php files. If you prefer, this can go in httpd.conf.
- Configure Virtual Hosts
Most Apache setups utilize Virtual Hosts. Here’s how to configure them.
- Configure php-fpm
Uncomment three lines from /usr/local/etc/php-fpm.d/www.conf.
- Enable and Start php-fpm
Add php-fpm to rc.conf, start the service, and restart Apache.
- Test PHP
Create an info.php file to test PHP and ensure FastCGI is working.
1. Activate mod_proxy & mod_proxy_fcgi
In /usr/local/etc/apache24/httpd.conf, uncomment the following lines by removing the # at the beginning of each line.
LoadModule proxy_module libexec/apache24/mod_proxy.so
LoadModule proxy_fcgi_module libexec/apache24/mod_proxy_fcgi.so
2. Deactivate mod_php
If you’re doing a fresh install ignore this step. If you currently have mod_php activate, you’ll want to deactivate it by commenting out the line by putting a # at the beginning or just deleting the line:
LoadModule php_module libexec/apache24/libphp.soWhile we’re at it, we can delete the lines that tell Apache how to handle php requests.
note: these lines might be in httpd.conf or they might be in a separate file in the Includes folder (if you’re using a Debian-based system, they might be in a file elsewhere). Also, your configuration might look slightly different. The key to look for is the line that begins with “SetHandler.”
    <FilesMatch "\.php$">
        SetHandler application/x-httpd-php
    </FilesMatch>
    <FilesMatch "\.phps$">
        SetHandler application/x-httpd-php-source
    </FilesMatch>
3. Create PHP Config File for Apache
This could be done in httpd.conf but we’re going to create a new file to keep things organized. Navigate to /usr/local/etc/apache24/Includes and create the file php-fpm.conf. Include the following:
<FilesMatch \.php$>
    SetHandler proxy:unix:/tmp/php-fpm.sock|fcgi://localhost/
</FilesMatch>
4. Configure Virtual Hosts
As mentioned above, if you don’t use Virtual Hosts you can dumb this config (minus the vhost parts) in httpd.conf. Also, note that the way my vhosts are configured may differ from yours. For example, there are other ways to configure SSL.
In /usr/local/etc/apach24/extra/httpd-vhosts.conf, your configuration should look similar to the following. Items in red need to be changed to the correct values (without the brackets). Depending on your existing setup, you may not have to make any changes in this step.
<VirtualHost [your ip address]:80>
    ServerAdmin [email protected]
    DocumentRoot "[path to your files]"
    ServerName [your url]
    ServerAlias www.[your url]
    ErrorLog "/var/log/sharpwriting.net-error_log"
    CustomLog "/var/log/sharpwriting.net-access_log" common
  <Directory [path to your files]>
    Require all granted
    AllowOverride All
    Options FollowSymLinks MultiViews
    <IfModule mod_dav.c>
      Dav off
    </IfModule>
  </Directory>
</VirtualHost>
5. Configure php-fpm
Navigate to /usr/local/etc/php-fpm.d/www.conf. Find the following lines, if necessary, uncomment them by removing the ; at the beginning of the line and change to the appropriate values. This will tell php-fpm to function over a unix socket rather than localhost.
listen = /tmp/php-fpm.sock
listen.owner = www
listen.group = www
6. Enable & Start php-fpm
Now we want to start php-fpm at boot by adding it to /etc/rc.conf and manually start the process now so we don’t have to reboot.
# sysrc php_fpm_enable=yes
# service php-fpm start
# apachectl restart
7. Test php-fpm
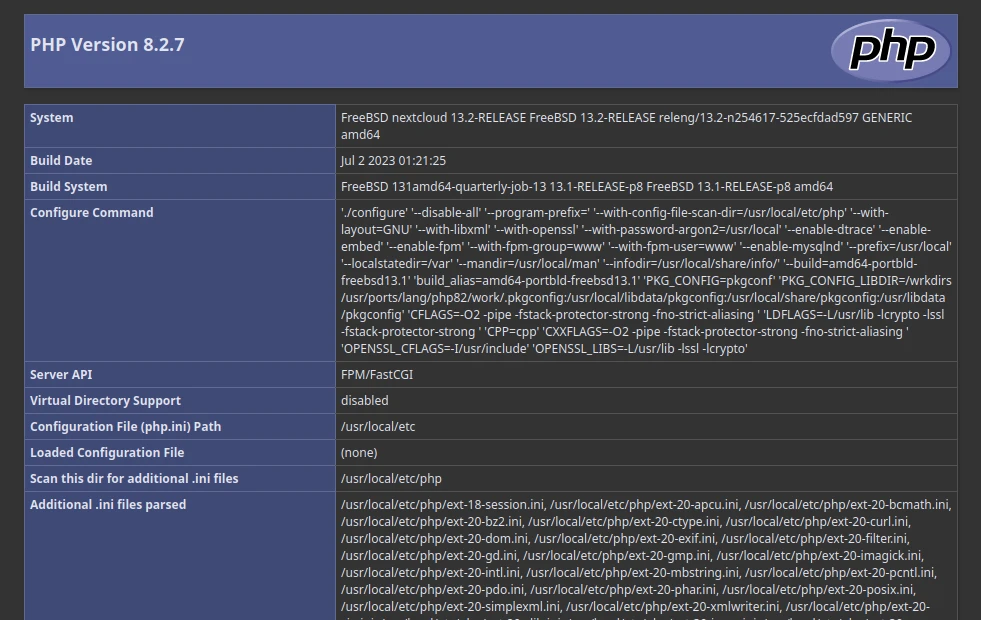
Navigate to your web files root and create a file. I’ll call mine info.php. Add the following content:
<?php phpinfo(); ?>Now, in a web browser, navigate to your domain [yourdomain]/info.php. In WordPress you might have to nest it in a folder, so it would be [yourdomain]/wp-content/info.php. You should see a screen like the image below. Notice how “Server API” lists “FPM/FastCGI.” That means it works! Note that, unlike in the example below, you want the “Loaded Configuration File” to point to a php.ini file.
You Now Have php-fpm running your WordPress site
Congratulations! Your site performance should now be slightly improved!