WordPress is the most common content management system (CMS) and most guides will show you how to install it on a Linux server (LAMP). Installing WordPress on a FreeBSD server (FAMP) is 95% the same process, but if you’re not familiar with FreeBSD those little things might throw you off. In this guide I’ll install WordPress on a server running FreeBSD 13.1.
Why FreeBSD?
There are two major reasons I would recommend that you use FreeBSD over Linux for WordPress. First, FreeBSD is easier to learn. You might turn up way more stuff when Googling for Linux help, but FreeBSD is more simple. Second, FreeBSD has ZFS built in. This means you can take “snapshots” of your system and undo major system changes if you break things. Once your system is up, you can even write a little script to take a daily or weekly snapshot and then send it off to a remote location to keep things backed up.
LAMP stands for Linux, Apache, MySQL, PHP. However, there should probably be a better way of describing this setup. Basically, modern websites are run by four major components: an operating system, a web server, a database, and an interpreted language that acts as a liaison between the database and the web server. LAMP is just the most common combination. You could create a site using FreeBSD, nginx, PostgreSQL, and Ruby, but FNPR just doesn’t roll off the tongue the way LAMP does. I would argue that the content management system you use—in this case, WordPress—is just as important as the technologies that support it.
Time needed: 1 hour
Install WordPress on a FAMP Server
- Install FreeBSD on a Remote Host
Either upload an ISO or have your hosting provider install FreeBSD for you.
- Install Apache HTTPD
Download Apache HTTPD from either pkg or install it manually using ports.
- Initial Apache Configuration and Test
Edit httpd.conf with your domain name and start Apache.
- Setup HTTPS
Install a Cloudflare Origin Certificate or a Let’s Encrypt Certificate.
- Install PHP and Necessary Modules
Install everything you need for PHP and connect it to Apache.
- Install and Configure MariaDB
Install MariaDB, run the script to secure the installation, and create a database for WordPress.
- Install WordPress
Go to your website in a browser, enter your database information, and create a WordPress user.
- Develop Your Website!
Now start coding and make a great website.
Install FreeBSD on a Remote Host
In this guide I’m assuming you have FreeBSD installed on a VPS or a bare metal server with a dedicated IP address and the networking is setup. For a future article, I’ll explain how to install WordPress on a local FreeBSD jail for a development site and how to migrate that to production.
Some hosting providers will provide you with the option to upload an ISO and install your OS from scratch. Usually they will install it for you, which is preferable because they get the networking stuff taken care of for you.
Install Apache HTTPD
Installing Apache HTTPD is easy using pkg. Note: Everything I’m installing can be done through the FreeBSD ports collection, but I’m not including that information because if you need this guide it’s probably best to go with pkg. If this is a fresh install (or jail) you’ll be prompted to install pkg, first.
# pkg install apache24Initial Apache Configuration and Test
In this step we’ll just get Apache running to make sure everything is working fine.
In /usr/local/etc/apache24 you will find your Apache configuration files. Why here? I have an article for that. Here you will find the httpd.conf file. The httpd.conf file is pretty much your entire Apache configuration.
Let’s edit httpd.conf. Find the line that says ServerName and change it to the appropriate value for your site:
ServerName http://wordpress.sharpwriting.net:80Some things to note: You’ll need a domain name or else you’ll need to put your server’s IP address here. But if you plan on making a public-facing site you definitely need a domain name. I went with a subdomain of this site so I didn’t have to purchase a domain name to run this example. The port 80 means it won’t be secured using SSL. That’s okay, we’ll do that in a future step. For now, we’re just checking that our networking is correct and Apache works.
Now, we need to enable and start Apache:
# sysrc apache24_enable=yes
# apachectl start
The first line will start Apache automatically whenever your system restarts. Check /etc/rc.conf to see what it did. The second line starts Apache. As long as you get no error, Apache can be running. You can check by running;
# apachectl statusNow go to your web browser and type in your domain name. You should see a plain white page that says, “It works!”
Set up HTTPS
In the good old days, for a single site you could just add the above to your httpd.conf and be ready to roll. Now it’s become standard to use TLS/SSL for all websites whether they are transferring sensitive information or not. This is a good thing, but it does make it slightly more complicated to set up your web server.
There are a couple of ways to do this. I recommend using Cloudflare. They sell domains at wholesale prices and will provide a free proxy and DNS service that will help protect your site from malicious actors. They also make the whole SSL thing a bit easier with a certificate that will last for fifteen years.
Here’s my guide to getting SSL with Cloudflare up and running.
An alternative would be to use Let’s Encrypt or sometimes your hosting provider will provide certificates.
Here’s a guide for installing a Let’s Encrypt certificate. Note that you’ll have to schedule a job to renew these every couple of months.
In /usr/local/etc/apache24/httpd.conf, uncomment the following lines (remove the number signs):
LoadModule socache_shmcb_module libexec/apache24/mod_socache_shmcb.so

LoadModule ssl_module libexec/apache24/mod_ssl.so

Include etc/apache24/extra/httpd-ssl.conf

Include etc/apache24/extra/httpd-vhosts.conf
Now we need to edit the /usr/local/etc/apache24/extra/httpd-vhosts.conf file. Replace the bold/red lines with your own values (replace 1.1.1.1 with your IP address). Note that you don’t have to fill out the admin e-mail if you don’t want to. That’s sort of an artifact from the past.
<VirtualHost 1.1.1.1:80>
    ServerAdmin [email protected]
    DocumentRoot "/usr/local/www/apache24/data"
    ServerName wordpress.sharpwriting.net
    ServerAlias
    ErrorLog "/var/log/wordpress-error_log"
    CustomLog "/var/log/wordpress-access_log" common
</VirtualHost>
And we also need to make some changes to /usr/local/etc/apache24/extra/httpd-ssl.conf:
#   General setup for the virtual host
SSLEngine on
DocumentRoot "/usr/local/www/apache24/data"
ServerName wordpress.sharpwriting.net:443
ServerAdmin [email protected]
ErrorLog "/var/log/httpd-error.log"
TransferLog "/var/log/httpd-access.log"

SSLCertificateFile "/path/to/certificate.crt"

SSLCertificateKeyFile "/path/to/keyfile.key"
Now go to your website using https:// (e.g. https://wordpress.sharpwriting.net) and you should see “It Works!” but this time your browser should show that the site is secure (usually a little lock next to the URL).
Install PHP and Necessary Modules
Copy/paste the following command. Well, if you’re reading this in the future you may have to change the PHP version ahead. Or, if you rely on some WordPress plugins that still don’t support PHP 8.0+, you may have to install older versions.
# pkg install php81 php81-curl php81-dom php81-exif php81-fileinfo php81-pecl-imagick-im7 imagemagick7 php81-mbstring php81-xml php81-zip mod_php81 php81-gd php81-pdo php81-pdo_mysql php81-mysqliNow we just need to enable PHP in /usr/local/etc/apache24/httpd.conf. Add the following line:
LoadModule php_module libexec/apache24/libphp.soFor the sake of organization, I put it at the end of all the other modules. Then add this to the end of the file:
<FilesMatch "\.php$">
    SetHandler application/x-httpd-php
</FilesMatch>
<FilesMatch "\.phps$">
    SetHandler application/x-httpd-php-source
</FilesMatch>
Finally, we’ll need to tell Apache to recognize “index.php” as the default file to server up. Find these lines and add the red part:
<IfModule dir_module>
    DirectoryIndex index.php index.html
</IfModule>
Now let’s test things out. Go to /usr/local/www/apache24/data and delete index.html. Now create a new file, index.php, and add the following content:
<!DOCTYPE html>
<html>
<body>
<?php
phpinfo( );
?>
</body>
</html>
Visiting your site should now show you the PHP info page.
Install and Configure MariaDB
MariaDB is a non-Oracle clone of MySQL, offering 1-to-1 compatibility. The just means that, as far as your system is concerned, it is MySQL. You can even call it with the mysql command.
First, let’s install MariaDB:
# pkg install mariadb106-server mariadb106-clientAs you can tell from the name of the packages, SQL works on a server/client model. Now we need to enable the server:
# sysrc mysql_enable=yes
# service mysql-server start
For development and testing purposes, MariaDB is insecure by default. For a production server, we need to run this basic script to make things secure:
# /usr/local/bin/mysql_secure_installationBasic setup:
- Do not enter a root password (just hit enter)
- Switch to unix_socket authentication [Y/n] — No is fine
- Change root password? No
- Remove anonymous users? Yes
- Disallow root login remotely? Yes
- Remove test database? Yes
- Reload privileges? Yes
Now we just have to create a database, user, and password for WordPress to use:
# mysql
> CREATE DATABASE wordpress;
> CREATE USER 'press'@'localhost'
> GRANT ALL PRIVILEGES ON wordpress.* TO 'press'@'localhost' IDENTIFIED BY 'testpasswordfortrialpurposes000';
> FLUSH PRIVILEGES;
> exit
Make sure you use a different username and password. Use something secure. Remember, your database contains all the content of your website, so it’s crucial that it’s secure.
Install WordPress
We’re almost there! Now, let’s install WordPress.
# cd /usr/local/www/apache24
# fetch https://wordpress.org/latest.zip
# unzip latest.zip
# rm -rf data
# mv wordpress data
# chown -R www:www data
In the first step we move to the server root folder where all our html/php is server up. We download the latest version of WordPress to this folder, unzip it, remove the old data folder, and rename our wordpress folder data. Finally, we give Apache (www) ownership of the data folder and everything inside of it.
Now go to your website. You should see this screen:
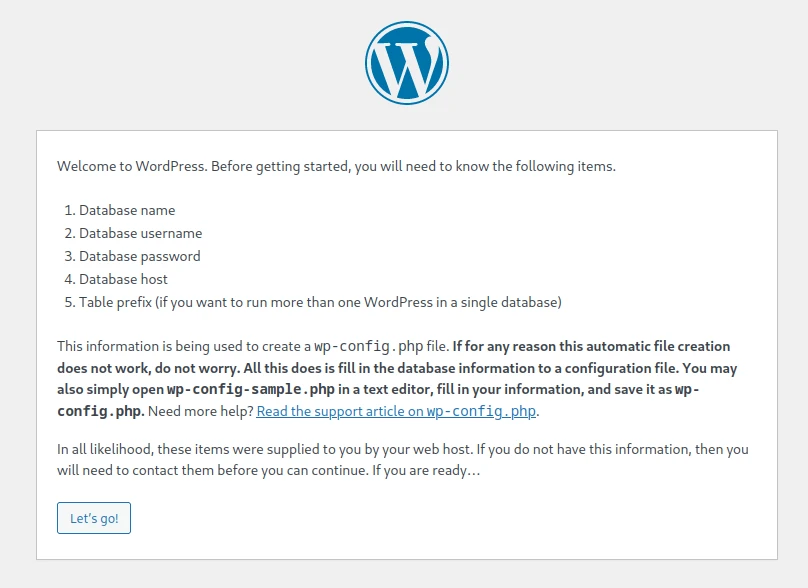
Click “Let’s go!” and fill out the necessary information.
On the next screen we use the database name, username, and password we created in the previous step. Change Database Host to 127.0.0.1 and then click Submit. You will be prompted to enter a username and password. Make this something different than your database username/password. You can now finish your WordPress installation.
Now you can enter the WordPress backend at https://your-site-name.com/wp-admin/
Develop Your Website!
You have now installed WordPress on a FAMP server! Now develop your website! This part is far beyond the scope of this guide, but you can now begin web development. Find a good theme, make a child theme, and use as few plugins as you can get away with.
If you would like me to write a guide regarding any specific WordPress topics, let me know at [email protected].